


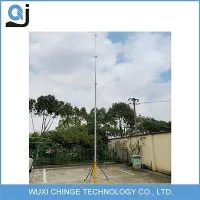
Hey there! As a supplier of winch up poles, I've seen firsthand how these nifty pieces of equipment can be a game - changer in various industries. Whether you're into telecommunications, event management, or just need a reliable way to get something up high, winch up poles are the way to go. So, let's dive into the steps to winch up a pole.
Step 1: Preparation is Key
Before you even think about starting the winching process, you need to make sure you've got everything ready. First off, pick the right location. The ground should be level and stable. You don't want your pole toppling over because the ground beneath it is uneven. If you're setting up on soft ground, you might need to use some stabilizing pads to distribute the weight evenly.
Next, gather all the necessary tools and equipment. You'll need a winch, of course, along with the appropriate cables and connectors. Check the winch to make sure it's in good working condition. Look for any signs of wear and tear on the cables, like fraying or kinks. If you spot any issues, replace the parts before you start.
Also, don't forget about safety gear. Hard hats, safety glasses, and steel - toed boots are a must. You don't want to take any chances when working with heavy equipment.
Step 2: Assemble the Pole
Once you've got your location sorted and your tools ready, it's time to assemble the pole. Most winch up poles come in sections, especially if they're telescopic. Start by laying out all the sections on the ground. Make sure they're clean and free of any debris.
Connect the sections according to the manufacturer's instructions. Usually, there will be some kind of locking mechanism, like pins or clamps. Tighten them up properly to ensure a secure connection. It's a good idea to have a helper or two during this step, as some of the sections can be quite heavy.
Step 3: Position the Pole
Now that the pole is assembled, it's time to get it into position. You can use a crane or a forklift to lift the pole upright if it's too heavy to do it by hand. Make sure the base of the pole is centered over the spot where you want it to stand.
Once the pole is upright, secure the base. This might involve bolting it down to a concrete pad or using stakes to anchor it to the ground. Double - check that the pole is perfectly vertical. You can use a level to make sure it's straight.
Step 4: Attach the Winch and Cables
With the pole in position, it's time to attach the winch and the cables. The winch should be mounted securely near the base of the pole. You can use bolts or brackets to hold it in place.
Connect one end of the cable to the winch drum. Make sure it's wound tightly and evenly. Then, run the cable up the pole. You'll usually find some guides or pulleys on the pole to help the cable move smoothly. Attach the other end of the cable to the top section of the pole.


Step 5: Start Winching
Before you start winching, make sure all the connections are tight and there are no loose cables. Give the winch a test run to make sure it's working properly. Start turning the winch slowly. As you do, the top section of the pole will start to rise.
Keep an eye on the cable tension. You don't want it to be too loose or too tight. If the cable is too loose, it might get tangled. If it's too tight, it could put too much stress on the winch or the pole.
As the pole rises, have someone at the top of the pole (using proper safety equipment, of course) to guide it and make sure it's going up straight. If you're using a motorized winch, you can set it to a slow speed and let it do the work for you.
Step 6: Extend the Pole (if Telescopic)
If you're using a Motorized Telescoping Mast, once the initial section is up, you can start extending the other sections. This is usually done by using a secondary winch or a motorized mechanism built into the pole.
Follow the manufacturer's instructions carefully when extending the sections. Make sure each section locks into place properly before you continue. This will ensure the stability of the pole.
Step 7: Final Checks and Adjustments
Once the pole is fully extended, give it a final check. Make sure all the sections are locked in place and the cables are still in good condition. Check the base of the pole to make sure it's still secure.
Adjust the height of the pole if needed. Some winch up poles allow you to fine - tune the height by adjusting the winch or the locking mechanisms on the telescopic sections.
Step 8: Install Your Equipment
Now that your pole is up and stable, it's time to install whatever equipment you need on it. This could be an antenna, a light fixture, or a camera. Make sure the equipment is mounted securely to the pole.
Use the appropriate brackets and fasteners to attach the equipment. Double - check the weight limits of the pole to make sure it can handle the additional load.
Step 9: Regular Maintenance
After you've got everything set up, don't forget about regular maintenance. Check the winch and the cables regularly for signs of wear. Lubricate the moving parts of the winch to keep it running smoothly.
Inspect the pole for any damage, especially after strong winds or storms. If you notice any issues, address them right away to avoid any safety hazards.
We offer a wide range of winch up poles, including the 50 Foot Telescopic Antenna Pole and the 30ft Telescopic Winch Up Mast. These poles are made of high - quality materials and are designed to last.
If you're in the market for a winch up pole, we'd love to hear from you. Whether you have questions about the installation process, need help choosing the right pole for your needs, or are ready to place an order, we're here to assist you. Contact us to start a conversation about your winch up pole requirements.
References
- General knowledge from years of experience in the winch up pole industry.
- Manufacturer's manuals for various winch up poles and related equipment.