


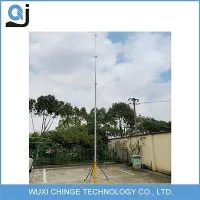
Hey there! If you're in the market for a new mast for your cranking - up operation, you've come to the right place. I'm a supplier of crank up masts, and I'm here to walk you through the process of installing a new one.
Why Install a New Mast?
Before we dive into the installation process, let's quickly talk about why you might want to install a new mast. Maybe your old mast is damaged, or perhaps you need a taller or more robust mast to meet your specific needs. A new mast can improve the performance of your equipment, whether it's for a light tower, an antenna, or something else.
There are some great options out there. For instance, the Light Tower Mast is a popular choice for outdoor lighting setups. It's designed to be sturdy and easy to operate, making it a great addition to any work site. Another option is the 30ft Hand Push Up Antenna Mast, which is perfect for those who need a reliable antenna support. And if you're looking for a mast for antennas that can extend and retract easily, the Telescoping Mast For Antennas is a top - notch choice.
Pre - installation Preparation
First things first, you need to gather all the necessary tools. You'll typically need a set of wrenches, a drill, a level, and some measuring tape. Make sure all your tools are in good working condition before you start.
Next, you have to choose the right location for your mast. The ground should be level and stable. If you're installing it on a soft surface, you might need to pour a concrete base to ensure the mast stays upright. Measure the area to make sure there's enough space for the mast to extend fully without hitting any obstacles.
It's also a good idea to check the weather forecast. You don't want to install the mast in the middle of a storm or strong winds. Ideally, pick a calm and dry day for the installation.
Unpacking and Inspecting the Mast
Once you've got everything ready, it's time to unpack the mast. Carefully remove it from the packaging and lay it out on a clean surface. Inspect the mast for any signs of damage during shipping. Check the joints, the cranking mechanism, and the overall structure. If you notice any issues, contact us right away, and we'll sort it out for you.
Installing the Base
The base is the foundation of your mast, so it's crucial to install it correctly. Start by marking the location where you want to place the base on the ground. Use your measuring tape and level to ensure it's in the right position.
Drill holes in the ground according to the base's mounting holes. Insert the anchor bolts into the holes and tighten them with a wrench. Make sure the base is firmly attached to the ground.
Attaching the Mast Sections
Now comes the fun part - attaching the mast sections. Most crank up masts come in multiple sections that need to be assembled. Start by aligning the first section with the base. Use the provided bolts and nuts to secure the section to the base. Tighten them evenly to ensure a stable connection.


Next, attach the second section to the first one. Make sure the joints are properly aligned and the locking mechanisms are engaged. Keep repeating this process until you've assembled all the mast sections.
Installing the Cranking Mechanism
The cranking mechanism is what allows you to raise and lower the mast. It's usually located at the base of the mast. Follow the manufacturer's instructions to install the cranking mechanism. Make sure all the gears and chains are properly lubricated and adjusted.
Raising the Mast
Before you start cranking, double - check all the connections and make sure everything is secure. Slowly start turning the crank to raise the mast. As you crank, keep an eye on the mast to make sure it's going up straight. If you notice any wobbling or uneven movement, stop immediately and check the connections.
Once the mast is fully raised, lock it in place using the locking mechanism provided. This will prevent the mast from accidentally lowering.
Attaching the Equipment
Now that your mast is up and ready, it's time to attach the equipment you need. Whether it's a light fixture or an antenna, follow the manufacturer's instructions for installation. Make sure the equipment is securely attached to the mast.
Testing and Final Checks
After attaching the equipment, test the mast and the equipment. If it's a light tower, turn on the lights and make sure they're working properly. If it's an antenna, check the signal strength.
Do a final check of all the connections, the cranking mechanism, and the locking system. Make sure everything is in good working condition.
Conclusion
Installing a new mast for your cranking - up operation might seem like a daunting task, but if you follow these steps, it can be a smooth and successful process. Remember, if you have any questions or run into any issues during the installation, don't hesitate to reach out to us. We're here to help you every step of the way.
If you're interested in purchasing a crank up mast or have any questions about our products, we'd love to hear from you. Just get in touch, and we can start a conversation about your specific needs and how we can meet them.
References
- General knowledge about mast installation and maintenance from industry experience.